This appendix provides a general introduction to the Tersus Studio, and the different tools provided to support modeling, such as the Model Editor, Outline, Repository Explorer, Template Library, and embedded application and database servers.
The Tersus Studio uses the Eclipse platform, which is an industry standard IDE framework, providing various features and significant flexibility, through the menus and toolbar, including the possibility to rearrange the display to suit your taste.
The Eclipse platform uses the notion of a Perspective displaying one or more Views, arranged in a specific way. Switching between perspectives changes the make-up and arrangement of views. The screenshot above displays the Tersus Modeling perspective which, by default, includes the following views: Model Editor, Palette, Outline, Repository Explorer, Properties and Validation.
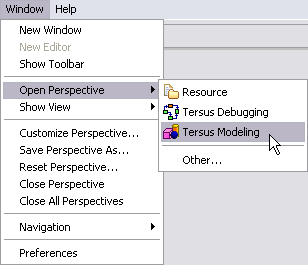
To switch to a different perspective, use Window -> Open Perspective
To change the arrangement of views in a perspective, click on a specific view’s title bar, drag it around and drop it in its new position.
For further information regarding the features provided by Eclipse, see the Eclipse platform help system (accessible through Help -> Help Contents).
Before we continue, make sure the Tersus Modeling perspective is displayed. To find out which perspective is currently in use, take a look at the Eclipse window title bar. If it does not start with “Tersus Modeling …”, then another perspective is currently displayed. If this is the case:
Select Window -> Open Perspective -> Tersus Modeling
Or, if the Tersus Modeling option does not appear:
Select Window -> Open Perspective -> Other…
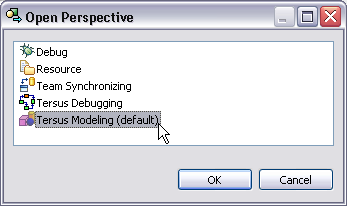
Select Tersus Modeling from the list, and click OK.
Eclipse should switch to the Tersus Modeling perspective, displaying the perspective name on Eclipse window title bar.
To start a new Tersus project do the following:
Select File -> New
The following submenu will appear:
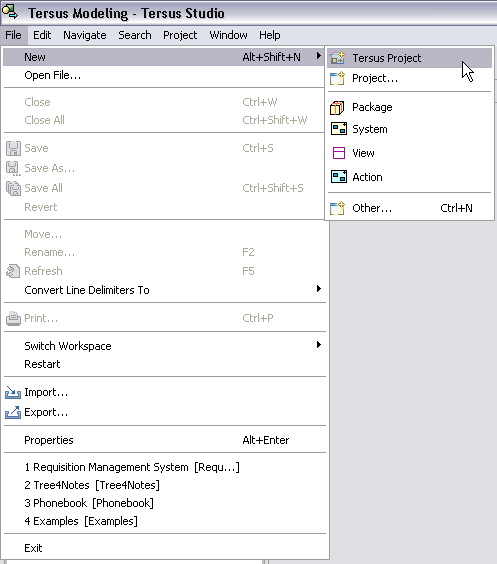
Select
![]() Tersus Project.
Tersus Project.
Note that there are two Project options in the menu – make sure you chose the first one (Tersus Project) rather than the second (Project ...).
The following dialog box will appear:
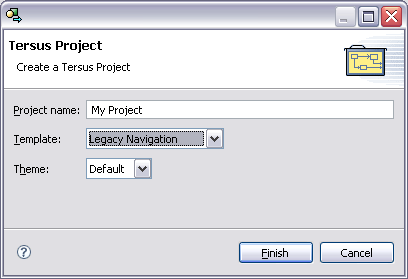
Enter a Project name for your new project: My Project.
Press the Finish button to create your first Tersus project.
You should see the following:
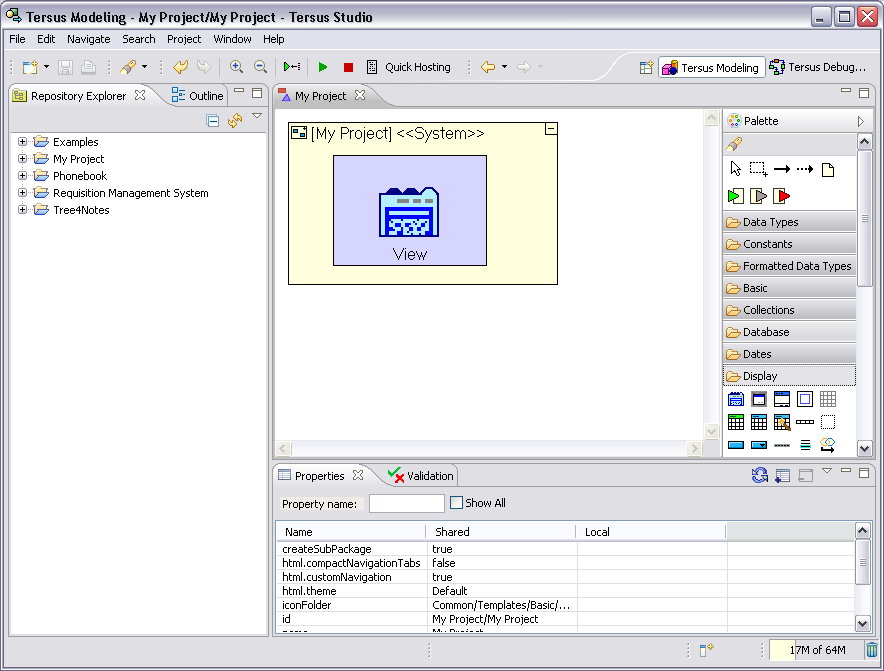
You can use the My Project project you have just created to test the different platform features discussed in this stage.
On
the right side of the Model Editor you can see the Palette ( ).
).
The palette contains four types of elements:
Editing Tools

Used to define and control the layout of elements in the editor.
![]() (Select) Selects and moves
elements in the editor.
(Select) Selects and moves
elements in the editor.
 (Marquee)
Selects all elements in the specified region of the editor.
(Marquee)
Selects all elements in the specified region of the editor.
![]() (Flow)
Creates a (regular) flow between elements in the editor.
(Flow)
Creates a (regular) flow between elements in the editor.
![]() (Remove)
Creates a remove flow between elements in the editor.
(Remove)
Creates a remove flow between elements in the editor.
![]() (Note)
Adds a note (documentation/comment) to an existing element in the
editor
(Note)
Adds a note (documentation/comment) to an existing element in the
editor
Slots

Used to define input/output “ports” of processes.
![]() (Trigger) A port used to
activate and pass input into a process
(Trigger) A port used to
activate and pass input into a process
![]() (Exit) A port used to pass
output from a process
(Exit) A port used to pass
output from a process
![]() (Error Exit)
A port used to pass errors (exception) from a process
(Error Exit)
A port used to pass errors (exception) from a process
Template Library
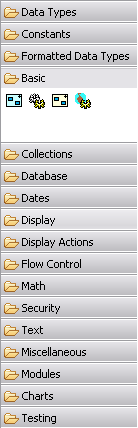
Templates are predefined elements which serve as building blocks for modeling. There are several categories of templates (such as Data Types, Database, Display etc.), and each category contains several templates.
 )
)When you select a template from the Palette and return to the editor, the mouse pointer changes to signify that a new element is going to be inserted into the model. There are 2 methods of insertion from the palette:
Click – Creates a new element with default size (hinted by a dashed rectangle).
Click & drag – Creates a new element with the size specified by the user.
New elements may also be inserted from the Repository and the Outline, using drag-and-drop. They will be created with a default size.
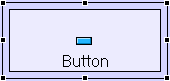
When you click on an element displayed in the editor, it becomes selected, marked with a frame, as in the following screenshot:
Selecting multiple elements is possible using the following methods:
After selecting the first element, hold down the [CTRL] key and continue to select additional elements.
Use the
Marquee tool ( )
in the palette to specify a selection area in the editor. All
elements in the marked area will be selected.
)
in the palette to specify a selection area in the editor. All
elements in the marked area will be selected.
When an element has been selected, drag it around to change its position in the editor.
After an element has been selected it can be resized by dragging any of the 8 selection anchors which appear around the selection frame.
Certain types of elements (specifically Display, Process and System elements) resize differently when the corner anchors are used. These elements may contain other elements, therefore when the corner anchors are used to resize, the aspect ratio of the element and its sub-elements (width-to-height ratio) is maintained.
Models are hierarchical, meaning that an element may contain other elements (making up sub-models), and each of these sub-elements can in-turn contain additional sub-models, and so on.
The model editor provides drill-down functionality which lets us view the different parts of the model at different levels of detail.
There are 2 methods to drill-down (or up):
Expand/Collapse
– elements in the model which contain other elements, display
a small
![]() (expand button) or
(expand button) or
![]() (collapse button). Clicking on the expand/collapse button will cause
the model editor to display the contents of the element (expand), or
hide them (collapse).
(collapse button). Clicking on the expand/collapse button will cause
the model editor to display the contents of the element (expand), or
hide them (collapse).
Double-clicking an element in the model expands it to display its contents, and in addition causes the editor to center the view on the model and zoom in or out so the model fits in the view.
There are various methods for zooming in and out:
Double-clicking an element in the model editor will cause the editor to zoom in/out and center on the element (in addition to expand if applicable).
Double-clicking an element in the outline is similar to double clicking in the editor. This method is useful when we want to move directly to part of the model which is not in the current scope of the display.
The toolbar
provides buttons for zoom-in (![]() ),
and out (
),
and out (![]() ).
).
Zoom works slightly differently for data-elements. Double-clicking will only function when performed on the top data element, and not on any of its descendant data elements.
The model editor provides full Undo/Redo functionality. This allows you to try out different modeling strategies, making quick changes to the model, without the fear of losing working functionality. Undo/Redo is available throughout an editing session, as long as the model editor window is open (saving and running the application does not prevent a later Undo)..
Undo/Redo functionality is available through the Edit menu as well as through [CTRL-Z]/[CTRL-Y] keyboard shortcuts.
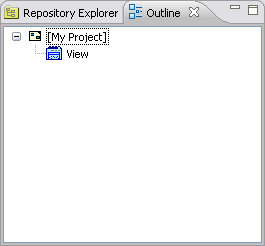
The Outline pane, which appears to the left of the model editor, provides a different view of the application model, as a hierarchical tree view of the elements making up the complete model. The outline is always synchronized with and reflects the hierarchical nature of the model itself (elements containing other elements, and so on).
The selected item in the Outline is always kept in sync with the selected element in the model editor. Selecting in one will always select the matching item in the other.
Double-clicking a model in the outline will locate and zoom to it in the current model editor.
This is useful when trying to zoom to a specific element (especially in complex model hierarchies).
Dragging a model from the outline and dropping it into the editor will reuse the model, which means that under certain restrictions (which will be covered in later stages of the tutorial), functionality which has already been modeled can be used again, instead of having to remodel it from scratch.
In the case of reuse, the same element appears multiple times (at different locations) in the outline tree. There are however situations where separate, unrelated models share the same name; this is possible when they are in different packages (see the section regarding Repository Explorer for further details).
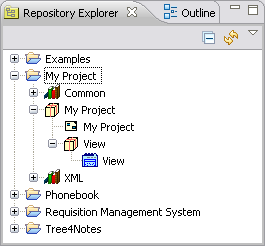
The Repository Explorer, which appears to the left of the model editor, provides a complete list of all the models making up an application.
The repository is organized hierarchically into Packages (and sub-packages), which group the models into functional categories. Packages are created automatically when certain templates (System, View, Button) are used, but you can always create additional packages and move models from one package to another to organize them as you see fit. When modeling, new elements are automatically created in the same package as the parent model to which they are added.
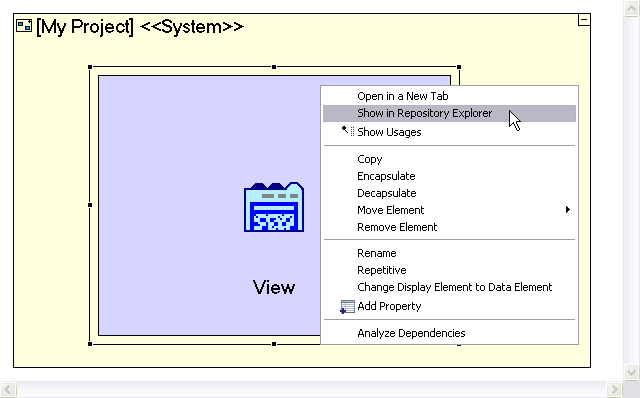
In order to locate, in the repository, the model you are currently editing, you can use the following shortcut:
Right-click the element in the editor.
Select the Show in Repository Explorer option from the context menu.
Double-clicking a model in the repository will open it in a new model editor window. When working on complex model hierarchies, you may use this to open and edit a specific sub-model.
Dragging a model from the repository and dropping it into the editor will reuse the model (similar to dragging from the Outline). The target model editor must be part of the same project as the source model.
Drag-and-drop inside the repository is also possible, resulting in the model being moved from one package to another.
Although both the repository and the outline display a project’s content in a hierarchical manner, there are quite a few differences between them, mainly:
|
Repository Explorer |
Outline |
|
The hierarchy displays all the models in all the projects. |
The hierarchy maps to and is in sync with the current model editor. Only the elements which make up the current model are displayed. |
|
Reused models appear only once |
Reused models appear as many times as they are used in the current model. |
|
Unused models appear in the repository and may be used again |
Unused models do not appear in the outline, since they are not part of the current model. |
|
The name displayed for each model is the Model Name. |
The name displayed for each model is the Element Name. |
Tersus includes a bundled, lightweight Application & Database Server, which can be used to view and test the modeled application at each stage of the modeling process.
The
embedded servers are controled through the studio's toolbar: 
![]() Launch the application, in the application server and open the browser.
Launch the application, in the application server and open the browser.
![]() Stop the
application, from running in the application server.
Stop the
application, from running in the application server.
 Show the application log file in a text editor window.
Try to view your application, as follows:
Click the ![]() button to start the application in the server, and open it in a browser.
button to start the application in the server, and open it in a browser.